
Event Markers
Event Markers
Section titled “Event Markers”Event markers allow you to trigger robot actions at precise moments during your autonomous routine. Whether you need to deploy an intake while driving, fire a mechanism while waiting, or spin up a flywheel while rotating, markers provide the synchronization you need.
Where Markers Go
Section titled “Where Markers Go”A marker belongs to one step of your sequence, and where it sits decides how it looks on the field:
- Path Markers: Triggered at a specific percentage along a driving path.
- Visual: Purple dots ● on the path line.
- Wait Markers: Triggered at a specific percentage of a wait command's duration.
- Visual: Purple circles with a flag icon ⚑ at the wait location.
- Rotation Markers: Triggered at a specific percentage of a rotation's completion.
- Visual: Cyan circles with a curved arrow icon ↻ at the rotation location.
Managing Markers
Section titled “Managing Markers”All markers are managed in the Event Markers panel, in the Field tab of the control panel.
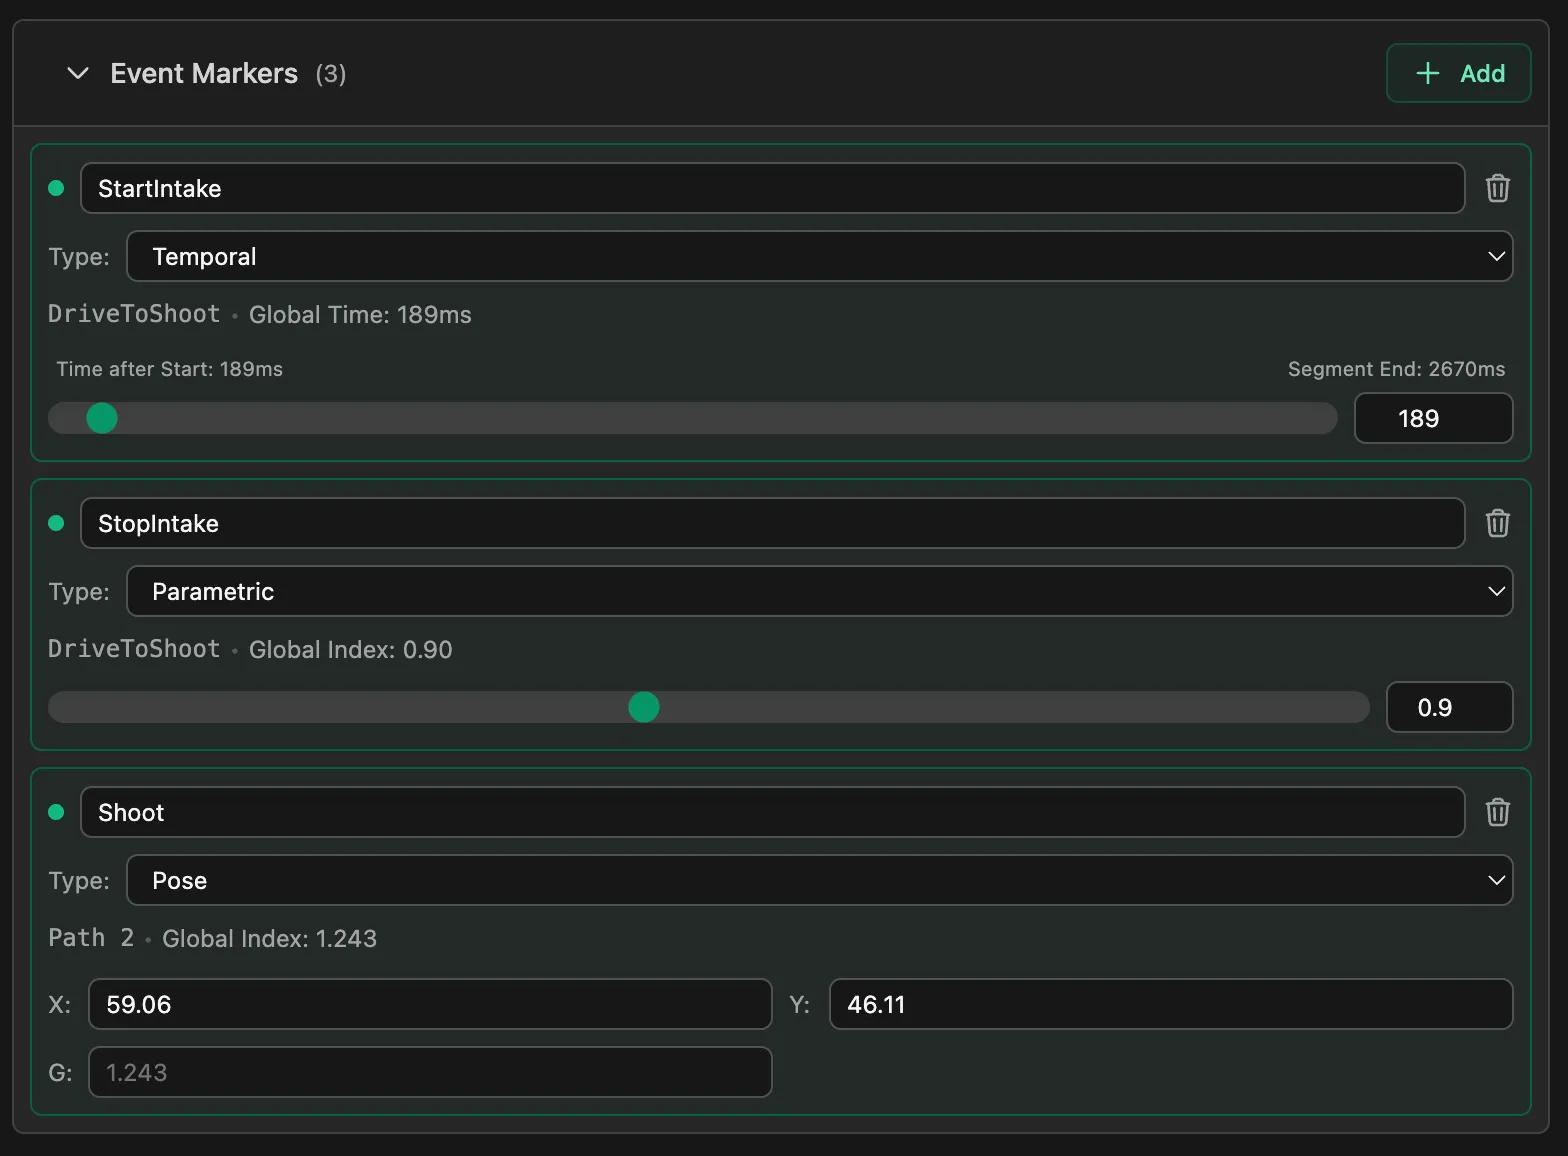
- Add a Marker: Click the green + Add button in the panel header. This adds a new marker to the end of your sequence.
- Name It: Type a name, or pick one you have already used from the dropdown (e.g.,
"IntakeDeploy","Shoot"). This name is used in your exported code to identify the event. - Choose a Type: Use the Type dropdown to decide what makes the marker fire (see below). New markers are Parametric.
- Position It: The controls under the type depend on which one you picked.
Trigger Types
Section titled “Trigger Types”- Parametric (default): Fires at a point along its step. Use the slider or number input to place it. The panel shows the position as a Global Index.
- Temporal: Fires at a set time. The slider and number input are in milliseconds, and the panel shows the Time after Start and the Segment End time of the step the marker is on.
- Pose: Fires when the robot gets close to a spot on the field. Enter the spot's X and Y in inches. The G field is optional: it says how far along the path the spot is, and when it is empty it is worked out from X and Y. In generated code the robot has to be within 2 inches of the spot.
Understanding Global Index
Section titled “Understanding Global Index”The "Global Index" value represents exactly where a parametric marker falls in your entire sequence. A pose marker shows a Global Index too, counted in paths: in the screenshot above, 1.243 is 24% of the way along the second path.
- The Whole Number (e.g., 1.xx): Represents the Step Index.
0.xxis the 1st step.1.xxis the 2nd step.2.xxis the 3rd step.
- The Decimal (e.g., x.50): Represents the % Completion of that step.
.00is the start (0%)..50is the middle (50%)..99is the end (99%).
Tip: You can drag the slider to seamlessly move a marker from one step to another (e.g., sliding it from a Path directly into the following Wait).
In Your Code
Section titled “In Your Code”When you export your autonomous routine, event markers are generated as TurtleTracerLib events and command triggers based on the Name you assigned. Parametric markers become onParametric triggers, temporal markers become onTemporal, and pose markers become onSpatial. Register a command with the same name in NamedCommands (or bind one with onEvent) so your robot code performs the action. Named Commands & Events shows how, for OpMode exports (with the Command Registrar), a RobotContainer, and Sequential Command exports. In routines with several paths, each path registers only its own markers, so a marker triggers on the path you placed it on.